 SEASON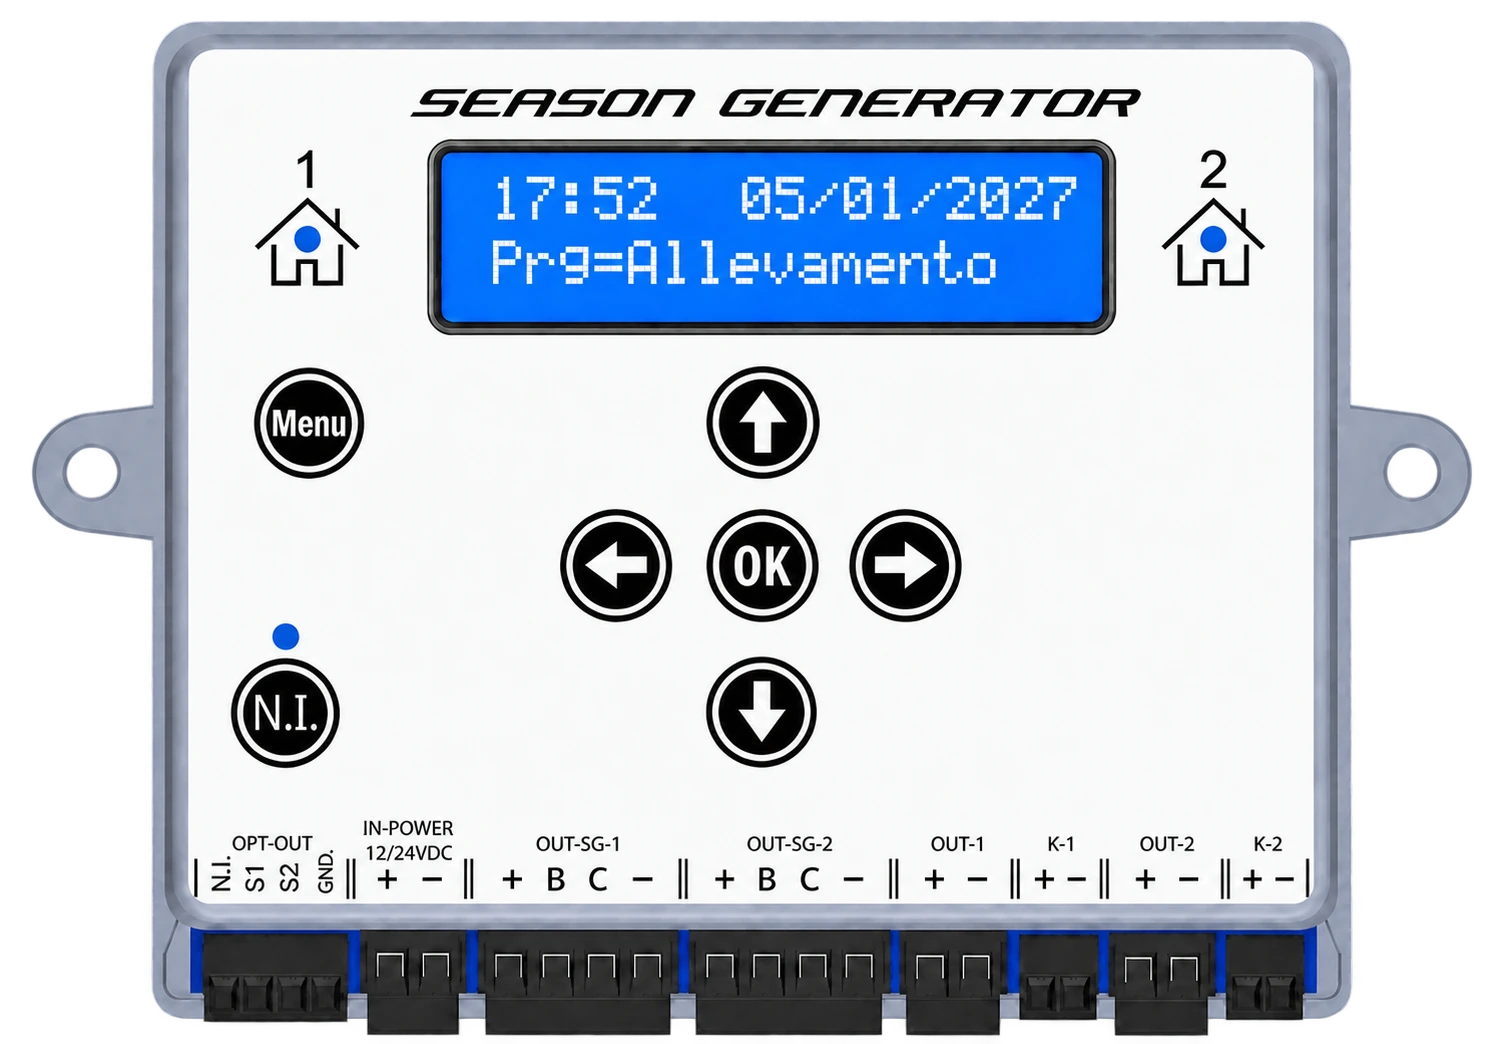
Four-wire PRO bars or two-wire Standard bars: choose the output that suits your system.
Lighting controller · LED bars
SOL-LED Plus
Everything the SOL-LED does, plus it switches neon tubes through relays and reads natural light with sensors. Dawn and dusk on the LED bars, full light for the whole room.
229,00 €VAT included
Illustrative images. Some images are digitally processed and may differ from the actual product. Check features and contents in the product details. Read the full notice
- Outputs K-1 e K-2: they drive an external relay that switches on neon tubes or ceiling lights in the room.
- Inputs S1 e S2 for the light sensors: energy saving with natural light.
- PRO 4-wire and Standard 2-wire LED bars, two independent rooms.
12–24 Vstabilised DC supply
2rooms with separate programs
K-1 · K-2relay coils for neon tubes and ceiling lights
S1 · S2natural light sensors
Photoperiod for LED bars
The season changes. The light follows it.
Dawn, day, dusk. Each room with its own program.
SOL-LED Plus dims low-voltage LED bars and updates the times according to the chosen program. You can use a seasonal table, define your own progression or simulate the sun cycle of a place.
Dawn and dusk have separate durations. Maximum brightness adapts to your system, and you can run two rooms with independent settings.
Explore the programsConnections
One input, every output.
The same panel as the SOL-LED, plus terminals for the neon relays (K-1, K-2) and for sensors and remote button (OPT-OUT).
12/24 V DC · input
Power supply
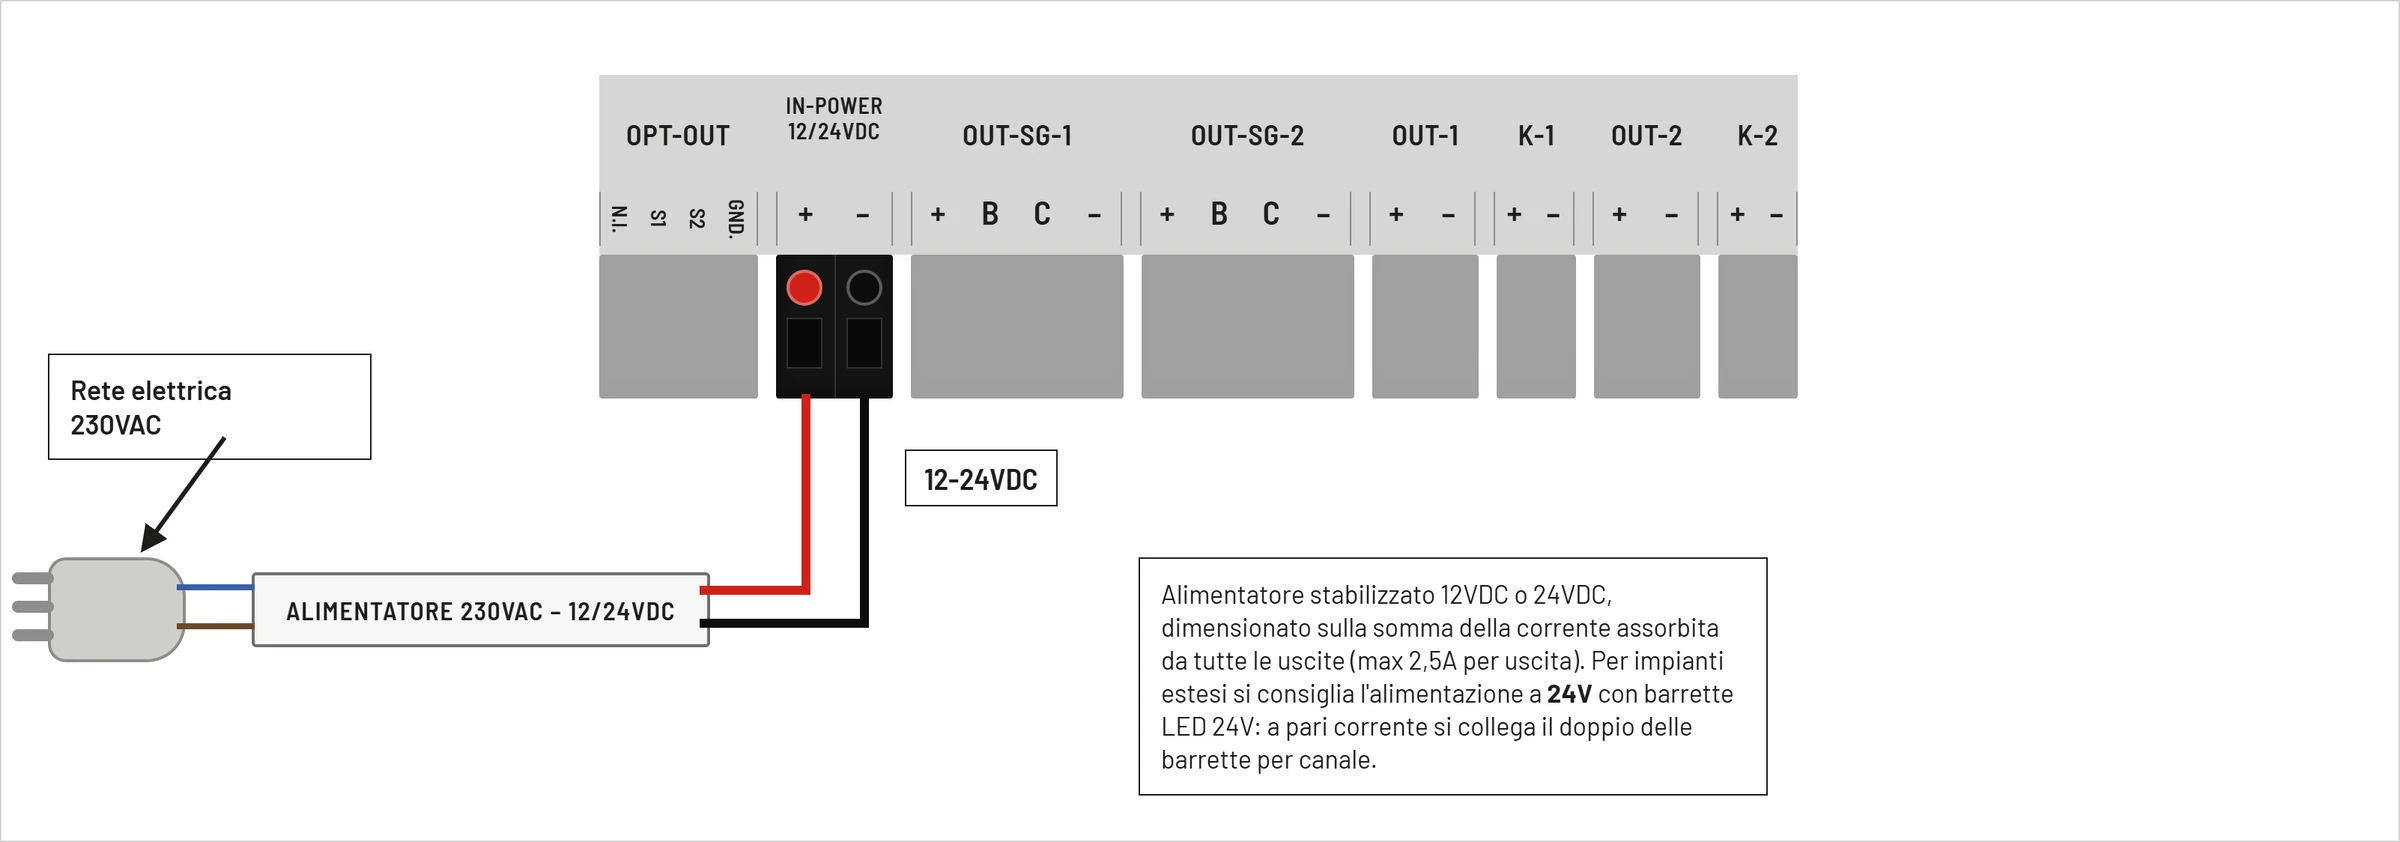
From an external stabilised power supply, chosen according to the voltage and load of the bars.
OUT-SG · OUT
LED bars
OUT-SG-1/2 for four-wire PRO bars, OUT-1/2 for two-wire bars: one room per output, up to 2.5 A.
Plus only · K-1 K-2 OPT-OUT
Neon tubes, sensors and button
K-1 and K-2 drive the relays that switch on the neon tubes; OPT-OUT receives the S1/S2 light sensors and the remote inspection button.
Power and connectionsTwo wires or four?
Two wires or four?
Each bar has its own output.
First choose the bar type and its voltage. Then match the power supply, output and wiring.
Network 230 V ACExternal power supply 12 or 24 V DCSOL-LED Plus and compatible bars
SOL-LED Plus receives 12–24 V DC stabilised: the 230 V mains connects only to the external power supply. Choose the voltage required by the bars and observe the + / − polarity.
PRO · 4 wires
White and blue separate
Season Generator PRO bars on OUT-SG-1 or OUT-SG-2: power, main light control and a dedicated blue channel.
See connections and colours →Standard · 2 wiresPositive and negative
Standard bars or compatible two-wire strips on OUT-1 or OUT-2, with dimming handled upstream by the controller.
See the two-wire connection →Season Generator PRO bars
Four wires, four functions.
OUT-SG-1 follows room 1. OUT-SG-2 follows room 2. Always respect the terminal labels and the connector order.
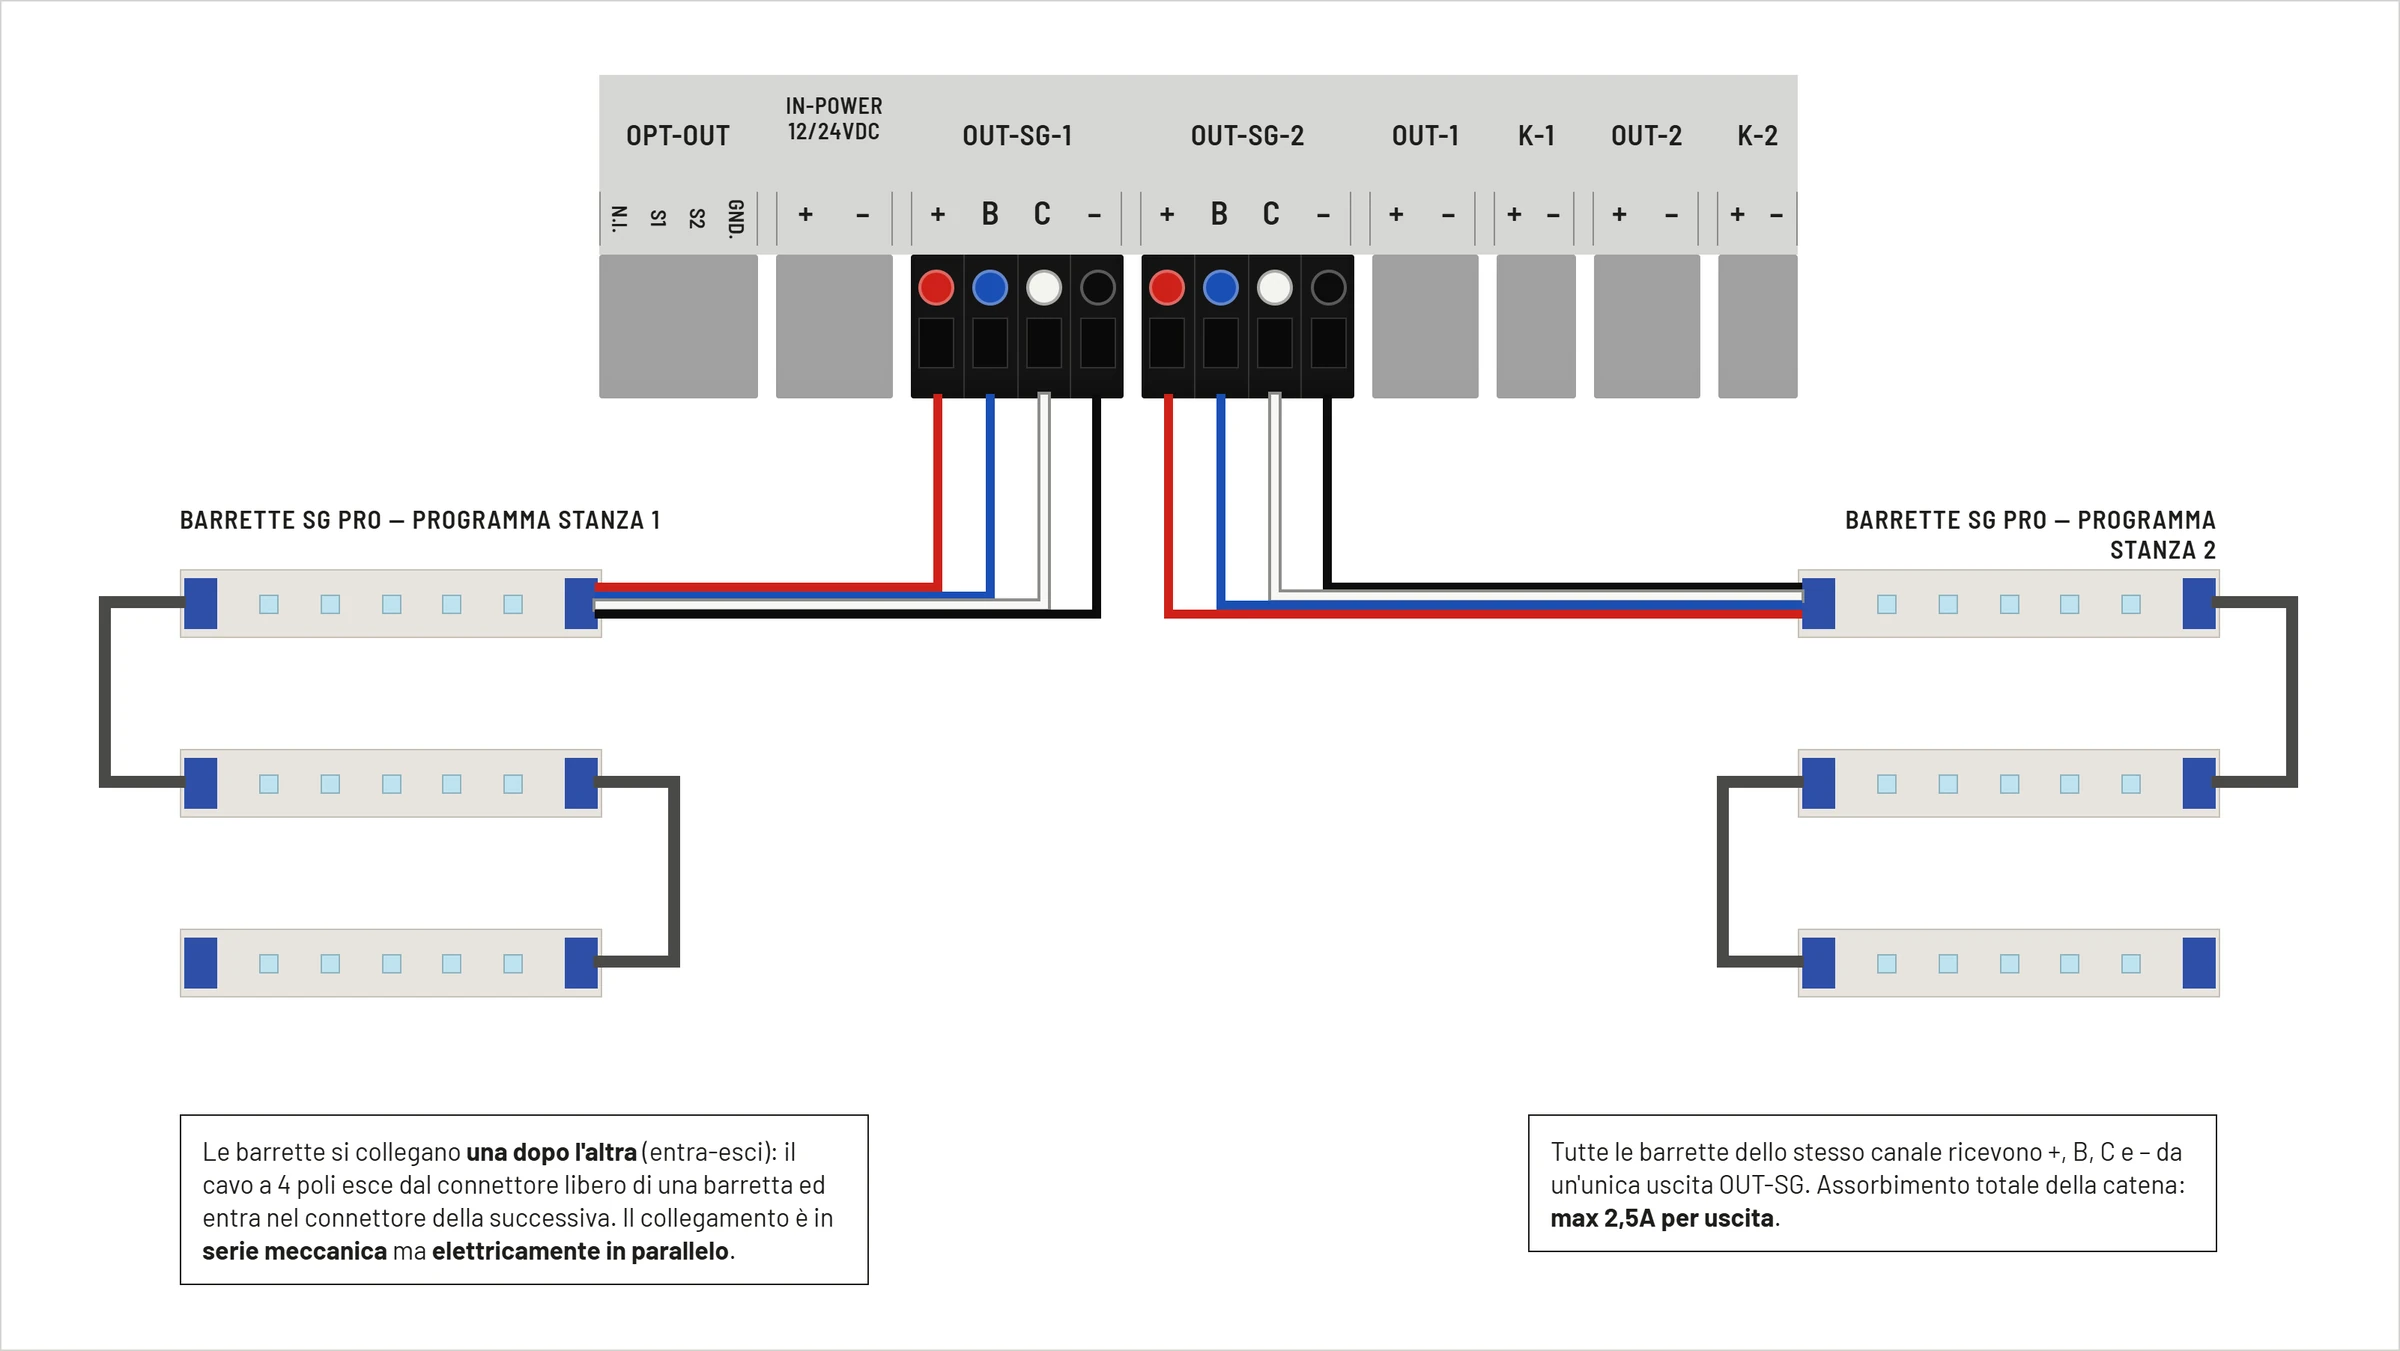
| Terminal | Wire | Function |
|---|---|---|
| + | Red | Supply positive |
| B | Blu | Blue LED channel / night light |
| C | White | PWM control of the main light |
| − | Black | Common negative / GND |
Limits given in the manual: power 2.5 A per output; channel B 100 mA; reference C 32 mA. Terminal C is a control, not a power output.
Open the PRO connection in the manual →Standard bars and two-wire LEDs
The light is regulated on the two conductors.
OUT-1 follows room 1. OUT-2 follows room 2. Use bars or strips compatible with the system's voltage and dimming.
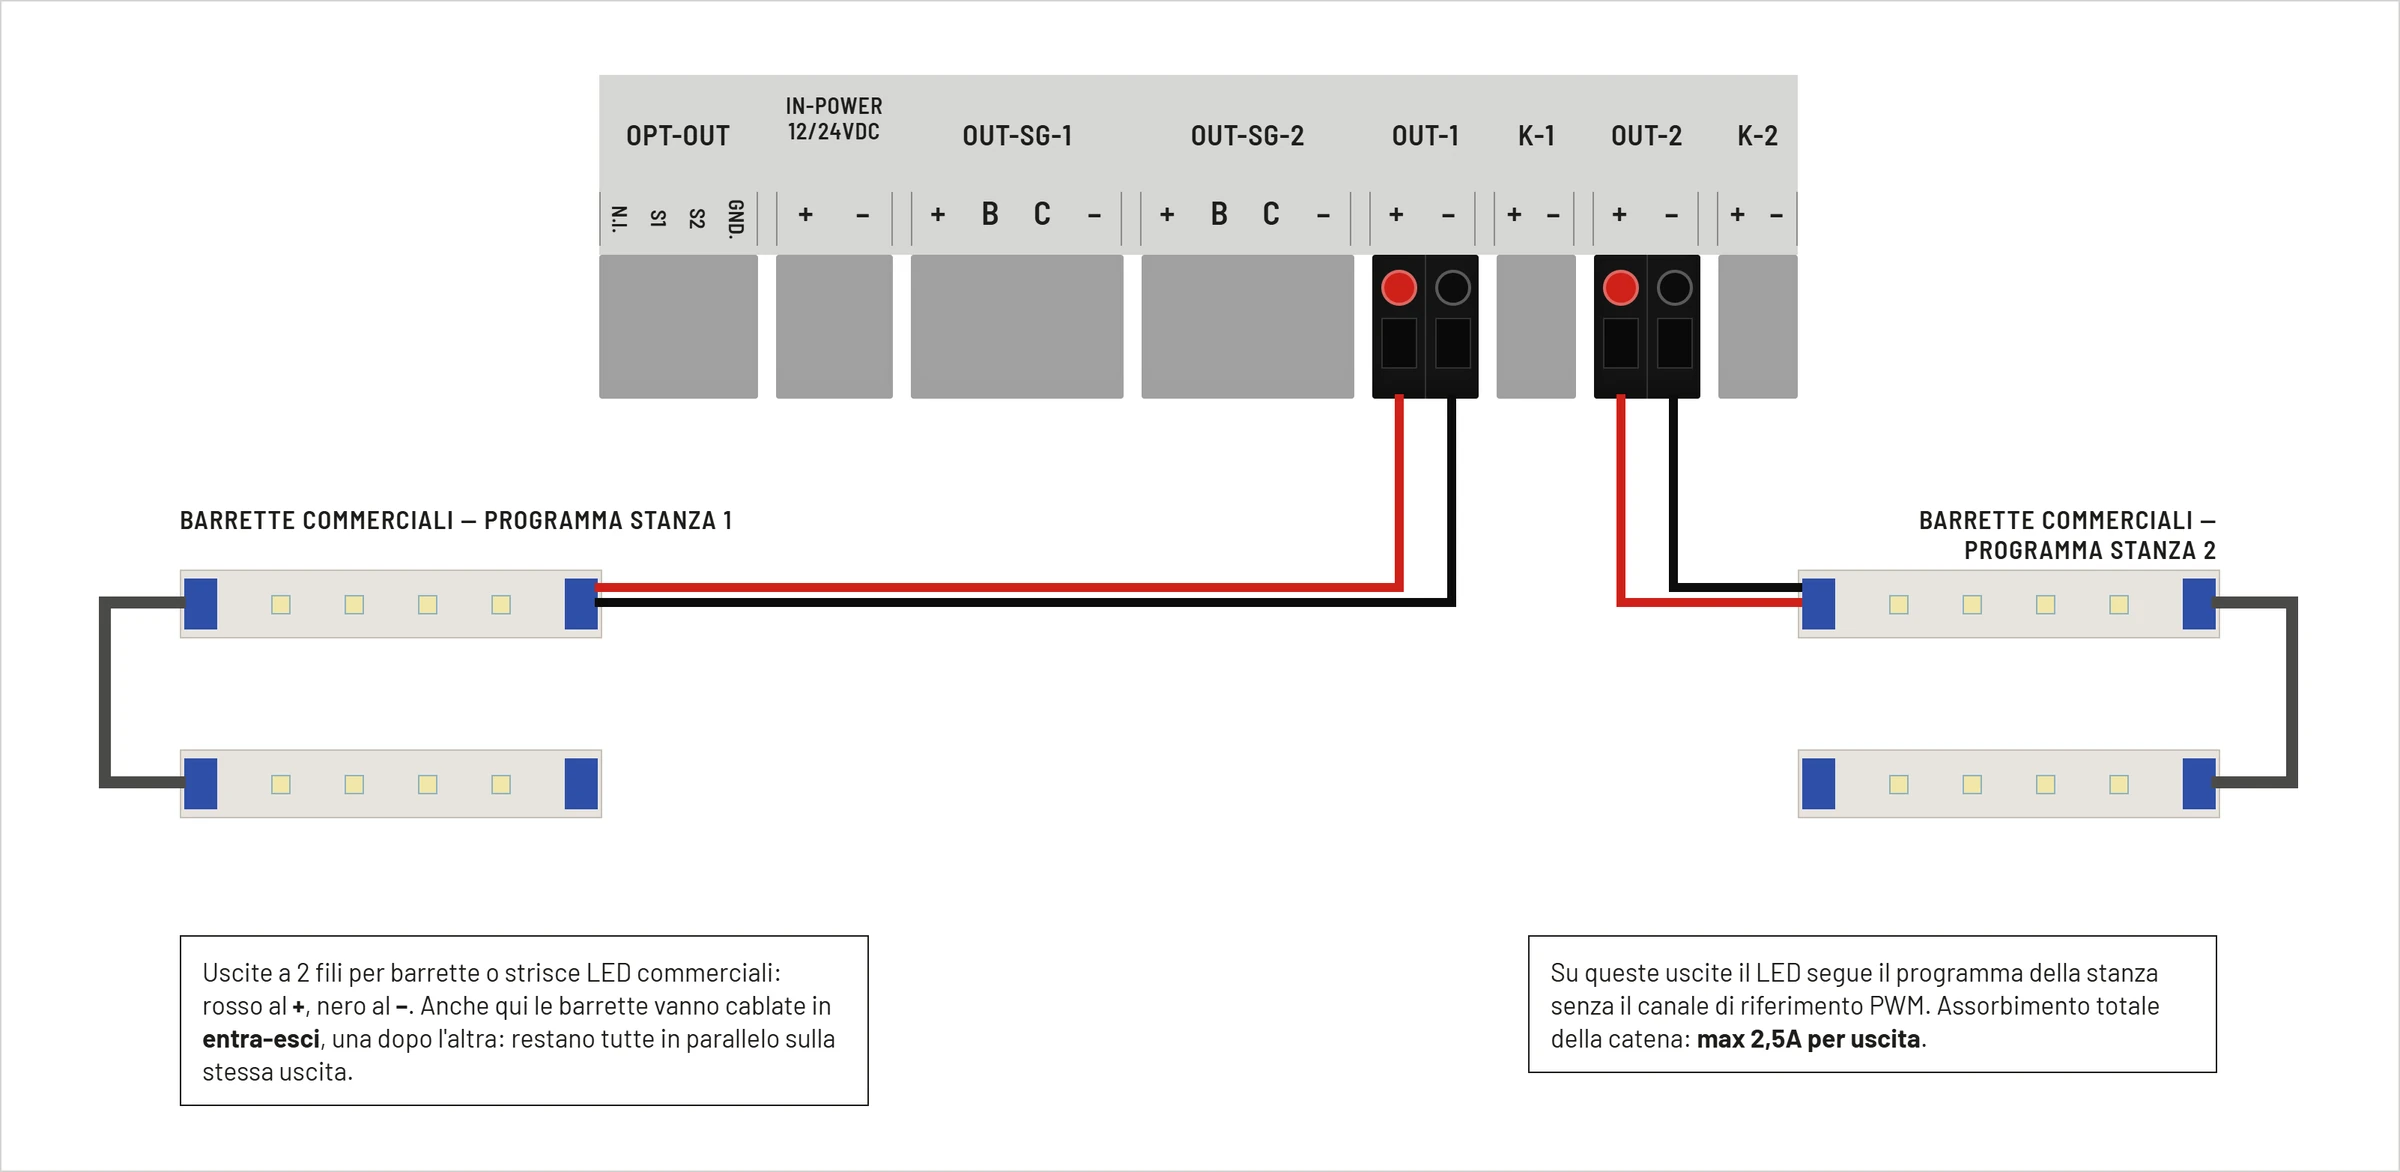
+ · red
Positive
Power to the bar, at the correct rated voltage.
− · black
Negative
Circuit return. The controller regulates the light on the two-wire output.
Standard bars have no separate conductor for the blue light. Don't swap OUT and OUT-SG, and don't connect the same bar to two outputs.
Open the Standard connection in the manual →Diagrams from the official SOL-LED Plus manual. Make connections with the power disconnected; check voltage, current draw and connector limits of each bar.
One controller, two rooms
Together or independent.
In the Room use menu, choose how the two groups work. The right arrow selects the room to display and configure.
2-room mode
Two different cycles
Program, ramps, intensity, night light and energy saving can be set separately for each room.
1-room mode
Two synchronised groups
Room 2 follows room 1: two LED groups light the same room with the same dawn and dusk cycle.
The current limit stays that of each output: synchronised mode does not let you add them together electrically.
More on Room use →
Light programs
The programs you know, now on LED bars too.
Seasonal tables, Personal program 1, Personal program 2 and AstroGPS Timer: choose the light cycle for each room. With Manual you can keep the same times every day.
Already loadedPreset tables
Choose the species, the cycle is already written
The annual tables are selected from the menu. The controller applies the seasonal profile and updates the times according to the date set. The tables available depend on the version supplied.
See the tables on the website. The menu also includes Manual, for fixed times, and, on versions that have it, the Breeding table.
SOL-LED Plus · Room use
Room 1Your cycle
Room 2Its own cycle
Select the room with the right arrow. In 2-room mode you can choose different programs and settings.
Personal program 1Daily increments
You set the change, it applies it every day
In the Personale program you set the starting dawn and dusk, a separate daily change for each of the two times, and the duration in days. At the end, the controller keeps the last times reached.
- Start — choose the starting dawn and dusk times.
- Change — set the daily minutes for dawn and dusk separately.
- Duration — choose for how many days to apply the changes.
- Confirm — save the program and the fade durations.
Demo video on the SOL-7000: it shows the logic of Personal program 1, shared by the SOL-LED Plus. For buttons and screens follow the SOL-LED Plus instructions below.
Read the program instructions →Personal program 2Automatic interpolation
Two end points, it works out the rest
With Personale2 you set the starting dawn and dusk, the end date and the times to reach. The start date is the controller's current date: check the time and date before confirming.
The controller automatically spreads the intermediate times day by day, up to the date you chose.
- Start — current date and starting dawn and dusk times.
- End — end date and times to reach.
- Automatic calculation — intermediate times spread day by day.
- Fades — set the duration of dawn and dusk.
Demo video on the SOL-7000: it shows the logic of Personal program 2, shared by the SOL-LED Plus. For buttons and screens follow the SOL-LED Plus instructions below.
Read the program instructions →AstroGPS TimerReal dawn and dusk
It knows where it is and what day it is
Set the controller's location, the time zone and the place whose photoperiod you want to simulate. AstroGPS Timer works out the seasonal progression and lets you enable twilight.
- Coordinates of the controller location.
- Set time, date and UTC offset correctly.
- Coordinates of the simulated location.
- Twilight can be enabled from the menu.
AstroGPS Timer42.50 · 12.50
Dawn06:20
Dusk19:45
Daylight hours13:25
Time zoneUTC +01:00
Illustrative display example, not a calculation for today's date. The real result depends on the date, coordinates and settings.
If you need a cycle entirely your own, different from these, you can draw it and send it to us: here's the page to do it.
Dawn and dusk
The light doesn't snap on: it rises.
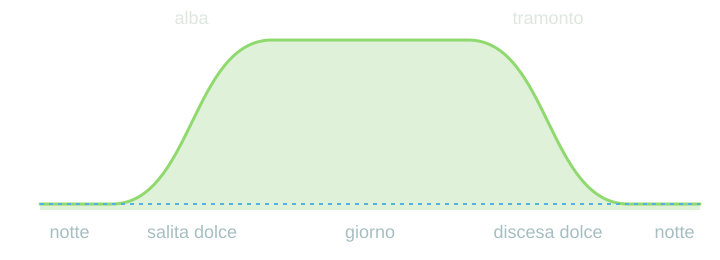
The dawn and dusk fades can be set from 1 to 100 minutes. The curve shows a gentle rise and fall, with rounded transitions into daylight and night.
Fade duration
20minutes
Illustrative diagram, not to time scale: dawn and dusk are widened to show how gradual they are. The dashed blue line shows the night light. Example with a 20-minute fade; the actual durations are set on the controller.
Night and light management
The right brightness in every phase.
Night light
A point of reference in the night
Set a reduced level or OFF. On PRO bars the blue channel is separate from the main light; choose the level by looking at the actual result in the room.
Night light →Inspection
Go in, check, resume the cycle
The INSP. button calls up temporary light for inspection. The ramp-in and ramp-out are adjusted separately.
Night inspection →Saving by time or by sensor
A pause when natural light is enough
You can set an off period and choose a gradual return to the program's light. On the SOL-LED Plus, saving can follow a time window or the S1 and S2 light sensors: see below.
Energy saving →SOL-LED Plus only · K-1 and K-2 outputs
The bars make the dawn. The neon comes on when needed.
The bars next to the cages create dawn, day and dusk gradually. If the room needs more light, the SOL-LED Plus also switches on neon tubes or ceiling lights through an external relay: when the bars' light reaches the threshold you choose, the relay clicks on; at dusk, below the threshold, it switches off.
Factory setting 80%. The relay switches on when the bars' light reaches the threshold and off when it drops below the same threshold.
One per room
K-1 follows room 1, K-2 room 2
Each output switches on the relay of its own room, with its own threshold. If a room's relay is set to NO, it always stays off.
Coil only
K-1 and K-2 do not power the neon
They supply 12 or 24 V DC, like the SOL-LED Plus power supply, up to 100 mA: enough for a relay coil. Neon tubes and lamps are connected to the relay contacts, never directly to the outputs.
At night too
Inspection with or without neon
During night inspection the light rises slowly: if it reaches the threshold, the neon switches on too. Press INSP. again before the threshold and the light stops there, without lighting the whole room.
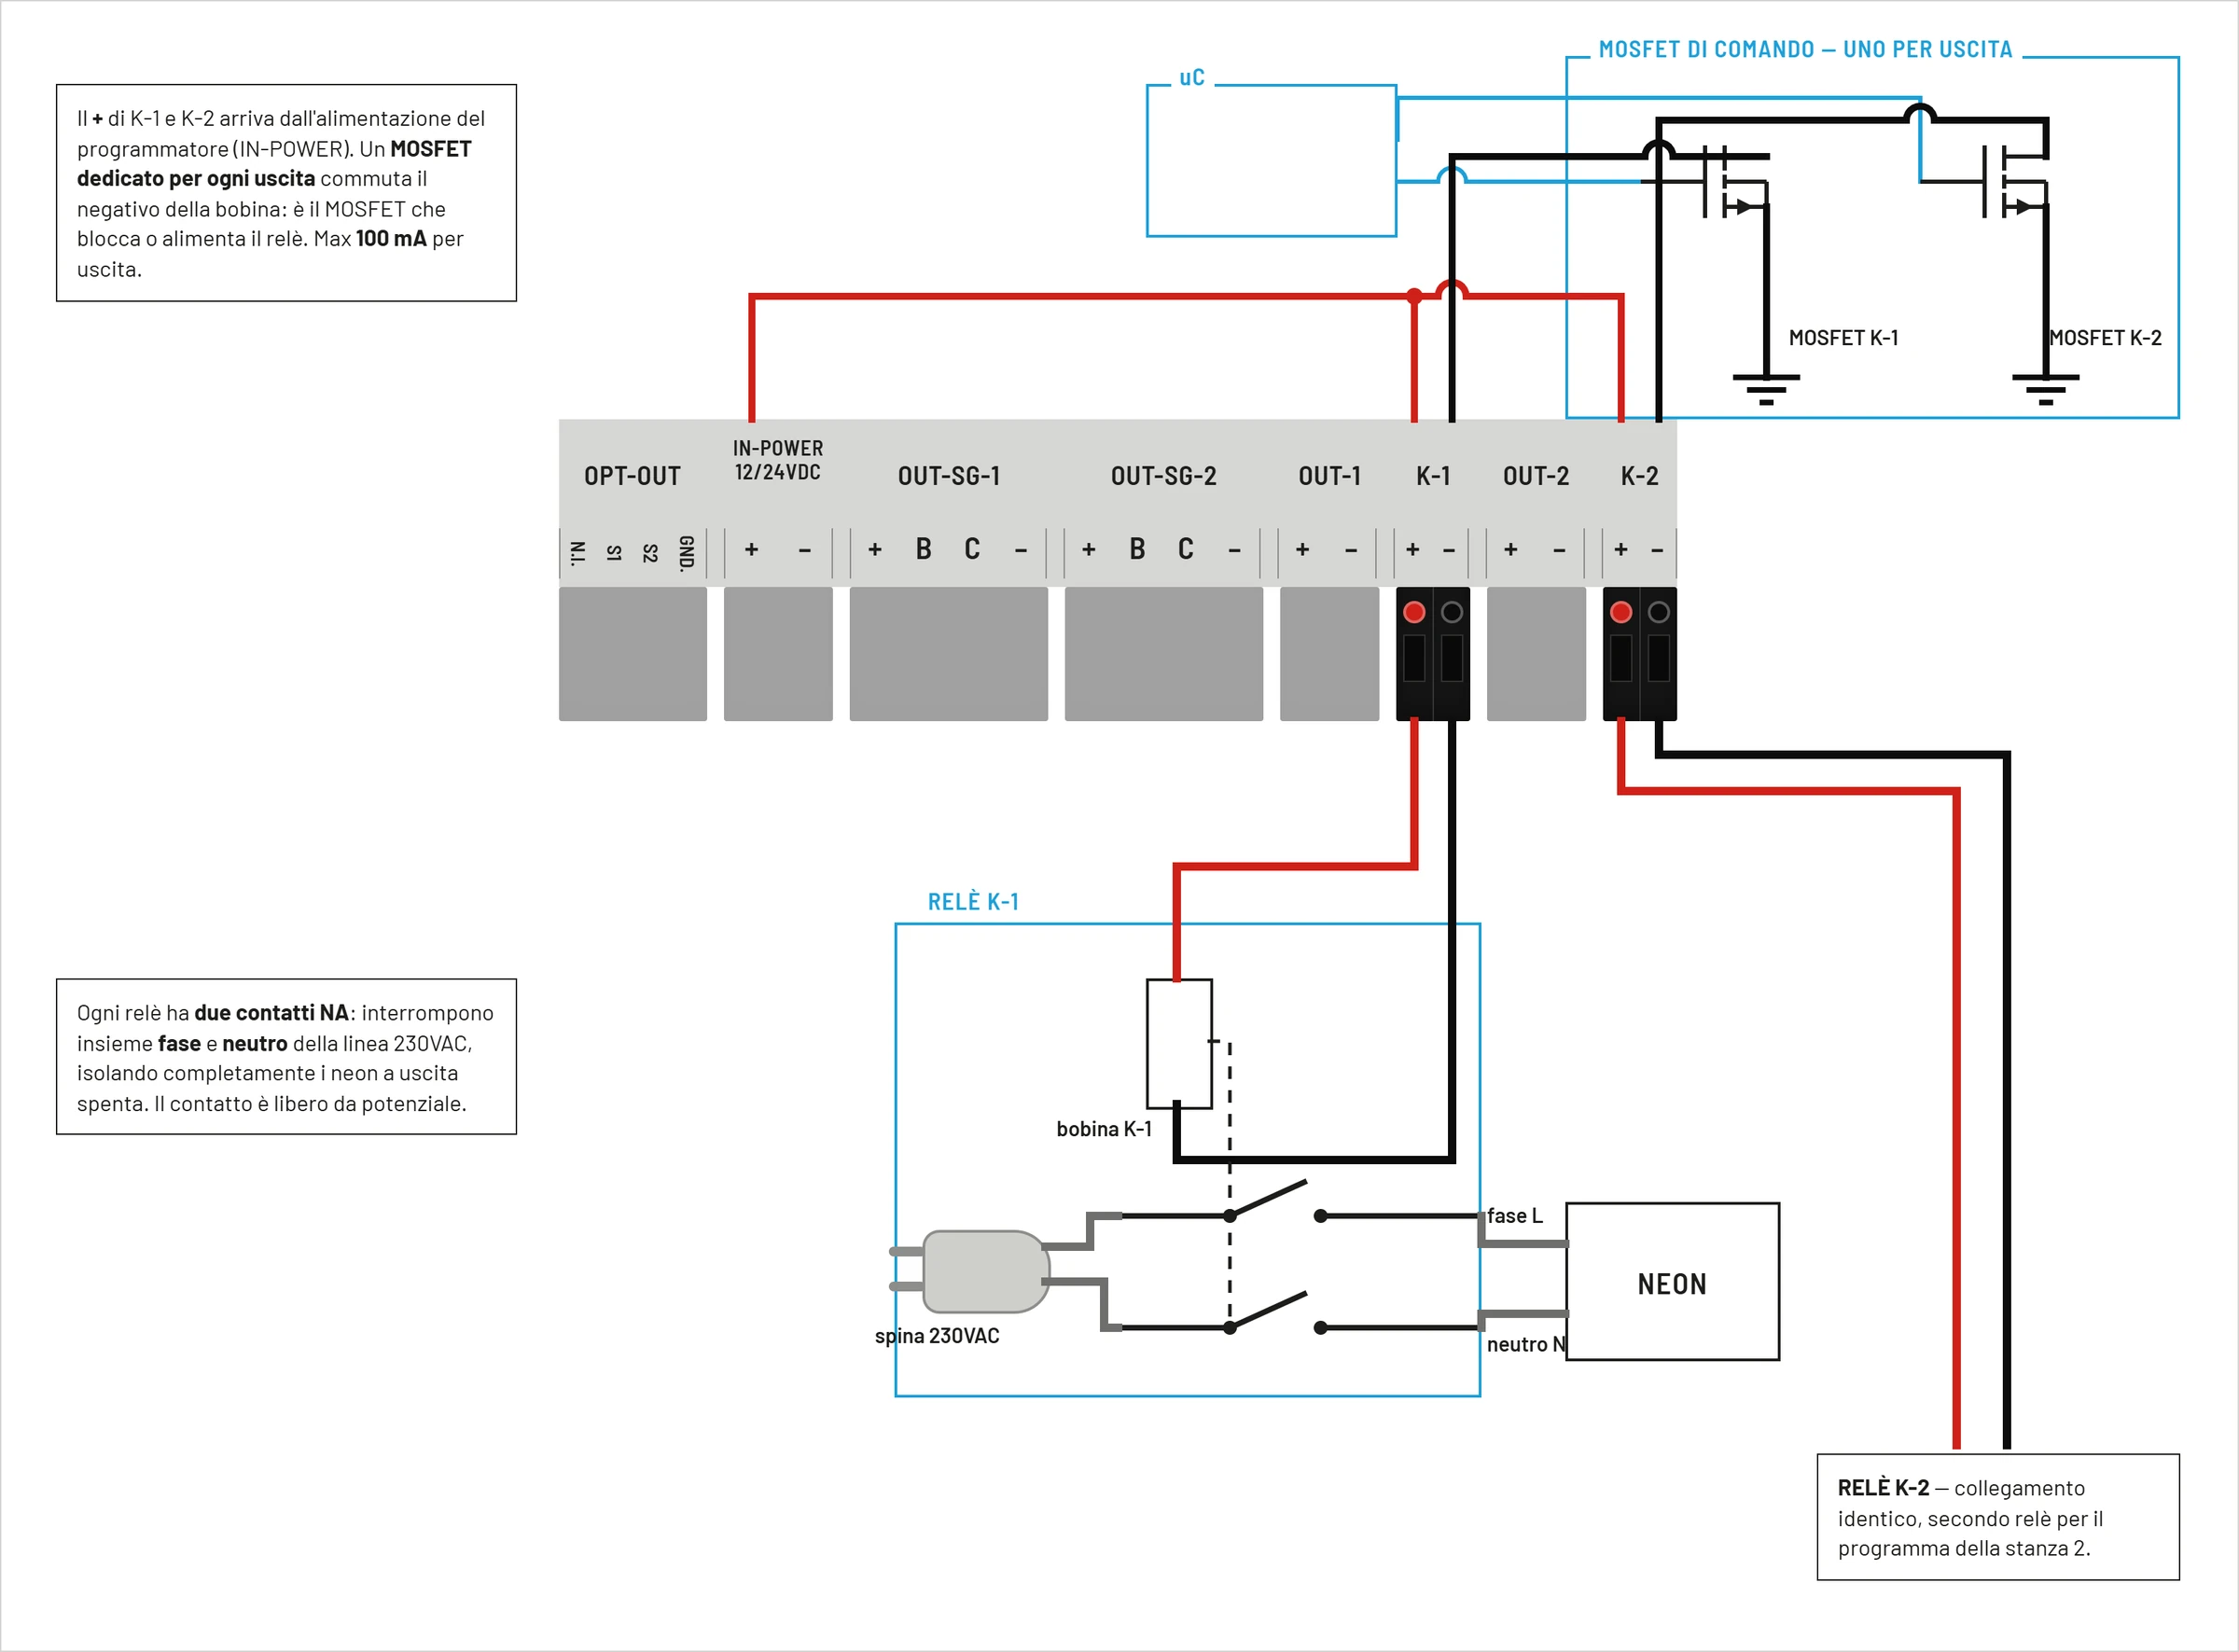
Official diagram from the SOL-LED Plus manual. Mains connections must be made by qualified personnel; always keep low voltage and 230 V separate.
Relays in the manual →SOL-LED Plus only · OPT-OUT inputs
When there is light outside, the bars rest.
The OPT-OUT terminal takes one light sensor per room (S1 and S2) and the remote inspection button (N.I.). With «With sensor» energy saving, when natural light is enough the controller switches off or dims the bars; when it fades, the program resumes by itself.
S1 e S2
One sensor per room
Room 1 sensor between S1 and GND, room 2 sensor between S2 and GND. Threshold and sensitivity are set in the Energy saving menu.
Where to put it
Near the window, away from the bars
The sensor must read natural light: if the system itself lights it, the reading becomes unstable.
N.I.
Remote inspection button
In parallel with the panel's INSP. button: start the inspection from the room door.
Accessories →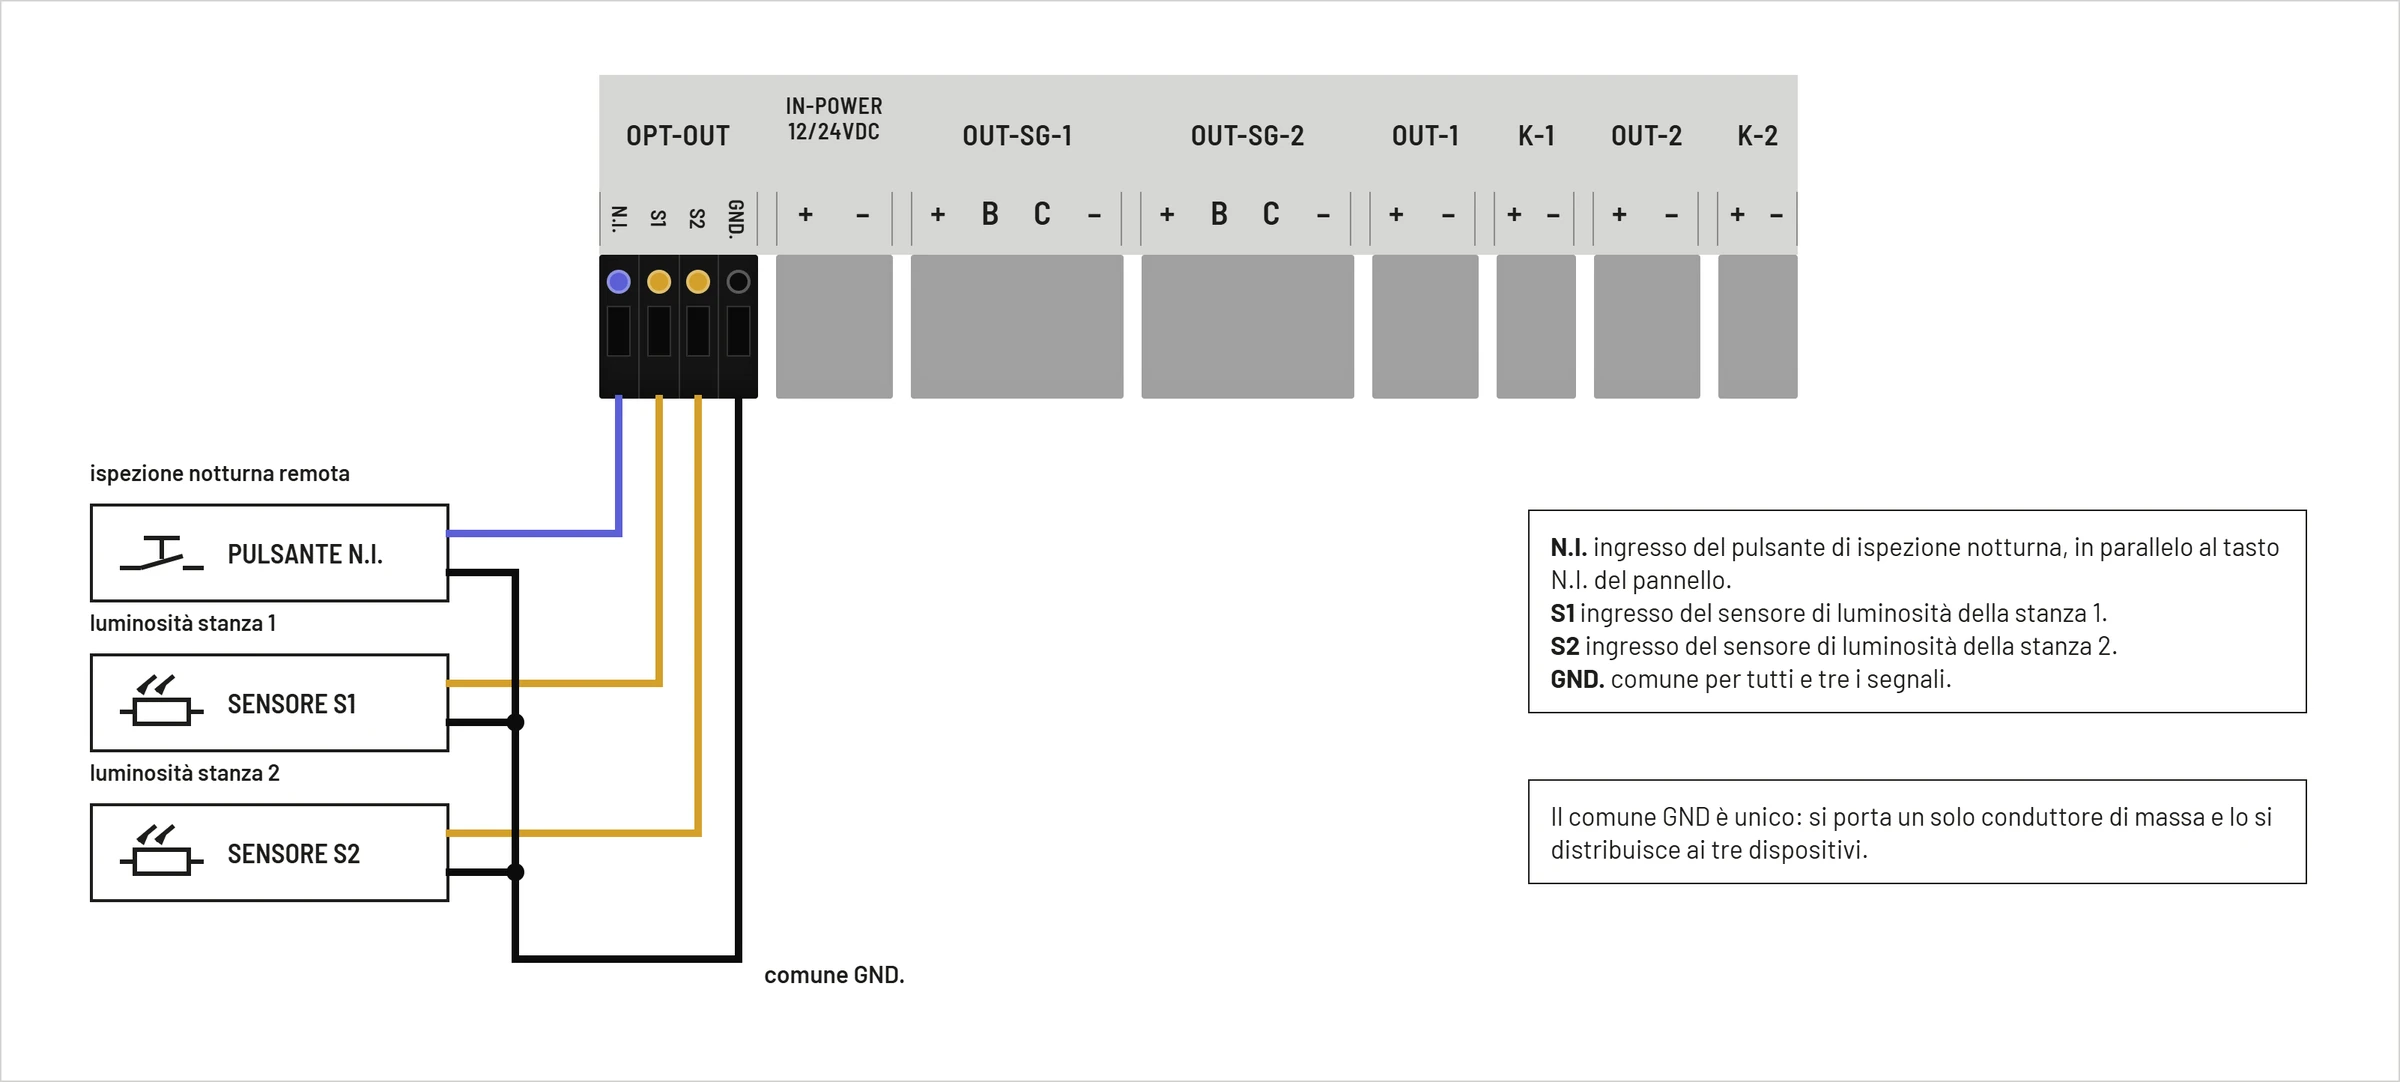
Complete your system
From the bars to the wall of cages.
Choose bars, cable lengths and fixings. In the configurator you can draw the layout of your system and prepare your request.
01 · Light
LED bars
Compare Standard and PRO, voltages, sizes and power ratings.
Choose the bar →02 · InstallationHooks and profiles
Consider cage fixing, guards and screens.
See the options →03 · DesignDraw your system
Lay out rows and columns of cages and choose the components.
Open the configurator →The design is indicative and will be reviewed before confirmation. Power supply, bars and accessories must be chosen according to the system.
Technical data
SOL-LED Plus in numbers.
| Power supply | 12–24 V DC stabilised, from an external power supply |
|---|---|
| Rooms | 2 independent, or 1 with synchronised groups |
| 4-wire PRO bars | OUT-SG-1 / OUT-SG-2 · terminals +, B, C, − |
| 2-wire bars | OUT-1 / OUT-2 · terminals + and − |
| Load current | 2.5 A maximum per output |
| Dawn and dusk ramps | 1–100 minutes, adjustable separately |
| Maximum brightness | 10–100% · fixed or seasonal intensity |
| Night light | OFF or a level up to 50% |
| Programs | Seasonal tables, Personal 1, Personal 2, AstroGPS Timer and Manual |
| Energy saving | Time window or S1 and S2 light sensors (one per room) |
| K-1 / K-2 relay outputs | External relay coil 12 or 24 V DC (same as the power supply), max 100 mA per output · PWM relay ON threshold 0–100% |
| OPT-OUT inputs | N.I. remote inspection button · S1 / S2 brightness sensors · common GND |
| Interface | LCD display, MENU, OK, arrow and INSP. buttons. |
| Memory | Settings in EEPROM; clock shared by the two rooms |
The controller for your system
SOL-LED Plus, SOL-LED or SOL-7000?
12–24 V · this page
SOL-LED Plus
All of the SOL-LED, plus K-1 and K-2 relays to switch on neon tubes and ceiling lights and inputs for light sensors.
229,00 €Choose the quantity12–24 V · bars only
SOL-LED
LED bars, two rooms, gradual dawn and dusk. When you need neither neon nor sensors.
Discover SOL-LED230 V lamps
SOL-7000
For dimmable mains lamps and ON/OFF loads. See the connections and the tested E27 LED lamps.
Discover the SOL-7000Frequently asked questions
Before connecting the bars.
What's the difference between two and four wires?
Standard bars take positive and negative on outputs OUT-1/OUT-2. PRO bars use OUT-SG-1/OUT-SG-2: besides positive and negative, they have the C control for the main light and the B channel for the blue LED.
Can I connect the SOL-LED Plus directly to a 230 V socket?
No. You need an external stabilised power supply: the SOL-LED Plus takes 12 or 24 V DC. The voltage must match that of the bars.
How many bars can I connect?
It depends on the model, the voltage and the current draw. Add up the consumption of the chain and respect 2.5 A per output, the limits of the PRO signals and those of the bar connectors. Also size the power supply and cables for the complete system.
Are daisy-chained bars connected in series?
They are laid out one after another, but electrically they stay in parallel. Keep the same wire-to-wire correspondence and never join the controller's outputs together.
Are the Personal 1 and Personal 2 programs here too?
Yes. The SOL-LED Plus manual covers Personal, Personal2, AstroGPS Timer, Manual and the seasonal tables. The linked videos show the shared logic; to configure the device follow the SOL-LED Plus instructions linked to each program.
Can I have two different schedules in the two rooms?
Yes, with Room use set to 2 rooms. In 1-room mode, on the other hand, the second follows the first.
Can I connect the neon directly to K-1 or K-2?
No. K-1 and K-2 only power the coil of an external relay (12 or 24 V DC, max 100 mA). The neon tube, ceiling light or lamps are connected to the relay's power contacts, and 230 V connections must be made by qualified personnel.
When does the neon switch on?
When the light of the room's bars reaches the PWM relay ON threshold (factory setting 80%). It switches off when the light drops below the same threshold, i.e. during dusk.
Manual and support
From wiring to the first program.
Official diagrams, instructions for every function and direct support to choose the components.